
ConstraintLayout이란
ConstraintLayout은 부모 뷰그룹 안의 다른 요소들과의 상대적인 제약조건을 설정함으로써 화면에 배치되도록 하는 레이아웃을 말합니다.
기존의 레이아웃(Linear, Relative 등등)에 비해 레이아웃이 중첩하지 않도록 복잡한 레이아웃을 만들 수 있습니다.
또한 안드로이드 스튜디오의 레이아웃 에디터로 만들기 편하고, 성능이 다른 레이아웃에 비해 우수합니다.
ConstraintLayout을 쓰는 것이 복잡한 View를 성능 저하 없이 만들 수 있는 방법으로 권장되었는데, Compose에서는 굳이 그럴 필요가 없어서 (Compose자체가 성능이 우수하기 때문에) 코드의 가독성이 아닌 이상은 굳이 권장하지 않는다고 한다.
근데 XML에서는 굳이 상관없으니 ConstraintLayout을 적극적으로 사용하자.
아래의 글을 참고해보자.
[Compose Layout] 6. ConstraintLayout 사용법 정리
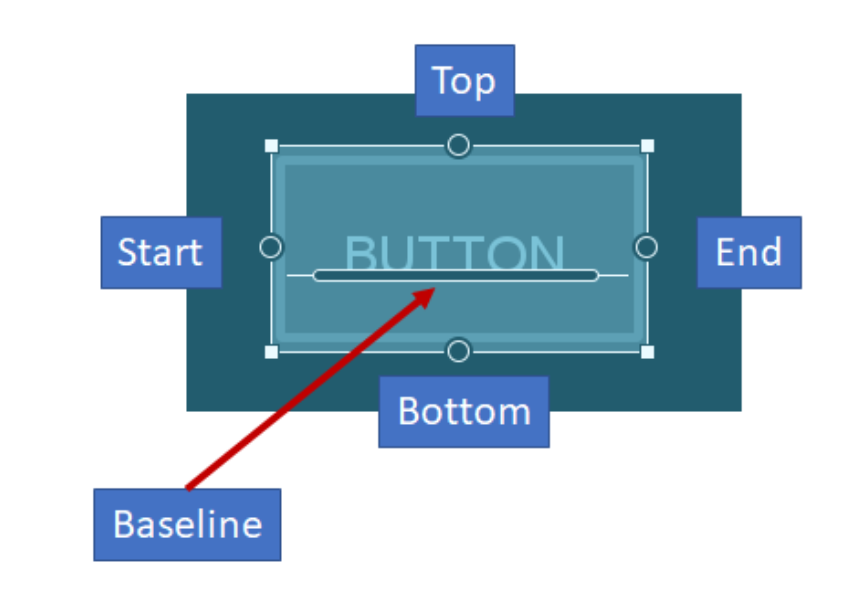
ConstraintLayout 이란? ConstraintLayout이란 View간의 상대적 제약조건(Constraint)을 만들 수 있는 Layout을 뜻한다. 상대적 제약조건이란 특정 뷰가 다른 View에 대해 위(Top), 아래(Bottom), 왼쪽(Start), 오른쪽(End)
kotlinworld.com
[Compose] Compose에서 ConstraintLayout을 쓰는 것이 권장 사항이 아닌 이유
ConstraintLayout이란? ConstraintLayout이란 Layout속의 View들간에 제약조건(Constraints)을 설정함으로써 복잡한 뷰를 만들 수 있도록 설계된 레이아웃이다. 과거 xml에서는 Constraint Layout을 쓰는 것이 권장되
kotlinworld.com
ConstraintLayout의 제약 유형
ConstraintLayout에서 사용될 수 있는 제약조건의 유형은 크게 9가지로 구분할 수 있다.
- Relative positioning (상대적 위치지정) : 다른 요소와 수평, 수직방향의 상대적 배치를 위한 속성
- Margins (여백) : 여백 설정을 위한 속성
- Centering positioning (중앙 위치지정) : 중앙 배치를 위한 속성
- Circular positioning (원형 위치지정) : 다른 요소와 원 형태의 상대적 배치를 위한 속성
- Visibility behavior (가시성 동작) : visibility 속성에 따른 동작 속성
- Dimension constraints (크기 제약) : 뷰의 크기를 위한 속성
- Chains (연결) : 수평 또는 수직방향으로 연결된 뷰를 위한 속성
- Virtual Helpers objects (가상의 도움 객체들) : 뷰의 배치에 도움을 줄 수 있는 객체 속성
- Optimizer (최적화) : 제약조건 최적화 속성
ConstraintLayout 시작하기
build.Gradle에 추가하기
dependencies {
    implementation("androidx.constraintlayout:constraintlayout:2.2.0-alpha07")
    // To use constraintlayout in compose
    implementation("androidx.constraintlayout:constraintlayout-compose:1.1.0-alpha07")
}
위젯 정렬 방식 지정
앵커를 사용하여 위젯들 간의 정렬 규칙을 정할 수 있다.

Start/End, Top/Bottom
<Button
    android:id="@+id/button1"
    android:layout_width="wrap_content"
    android:layout_height="wrap_content"
    android:text="Button"
    app:layout_constraintBottom_toBottomOf="parent"
    app:layout_constraintEnd_toEndOf="parent"
    app:layout_constraintStart_toStartOf="parent"
    app:layout_constraintTop_toTopOf="parent" />
Bias
수평, 수직, bias 값을 주어 가운데가 아니라 좌우, 상하로 이동할 수 있다.

<Button
    android:id="@+id/button1"
    android:layout_width="wrap_content"
    android:layout_height="wrap_content"
    android:text="Button"
    app:layout_constraintBottom_toBottomOf="parent"
    app:layout_constraintEnd_toEndOf="parent"
→   app:layout_constraintHorizontal_bias="0.3"
    app:layout_constraintStart_toStartOf="parent"
    app:layout_constraintTop_toTopOf="parent" />
Button1의 Start, End, Top, Button ConstraintLayout는 parent로 연결
Button2의 ConstraintLayout Start를 Button1의 End로 연결

<Button
    android:id="@+id/button1"
    android:layout_width="wrap_content"
    android:layout_height="wrap_content"
    android:text="Button1"
    app:layout_constraintBottom_toBottomOf="parent"
    app:layout_constraintEnd_toEndOf="parent"
    app:layout_constraintStart_toStartOf="parent"
    app:layout_constraintTop_toTopOf="parent" />
<Button
    android:id="@+id/button2"
    android:layout_width="wrap_content"
    android:layout_height="wrap_content"
    android:text="Button2"
    app:layout_constraintBottom_toBottomOf="parent"
    app:layout_constraintEnd_toEndOf="parent"
→   app:layout_constraintStart_toEndOf="@+id/button1"
    app:layout_constraintTop_toTopOf="parent" />
Chain
위젯 여러개를 한 줄로 정렬하고 싶을 때 사용한다.

버튼 위젯 3개를 배치하고 3개를 드래그하여 모두 선택한 후
오른쪽 마우스 버튼 눌러서 팝업 메뉴 Chains > Create Horizontal Chain
버튼간의 Constarint가 서로 연결되는 형태

<Button
    android:id="@+id/button1"
    android:layout_width="wrap_content"
    android:layout_height="wrap_content"
    android:text="Button1"
    app:layout_constraintBottom_toBottomOf="parent"
    app:layout_constraintEnd_toStartOf="@+id/button2"
    app:layout_constraintStart_toStartOf="parent"
    app:layout_constraintTop_toTopOf="parent" />
<Button
    android:id="@+id/button2"
    android:layout_width="wrap_content"
    android:layout_height="wrap_content"
    android:text="Button2"
    app:layout_constraintBottom_toBottomOf="parent"
    app:layout_constraintEnd_toStartOf="@+id/button3"
    app:layout_constraintStart_toEndOf="@+id/button1"
    app:layout_constraintTop_toTopOf="parent" />
<Button
    android:id="@+id/button3"
    android:layout_width="wrap_content"
    android:layout_height="wrap_content"
    android:text="Button3"
    app:layout_constraintBottom_toBottomOf="parent"
    app:layout_constraintEnd_toEndOf="parent"
    app:layout_constraintStart_toEndOf="@+id/button2"
    app:layout_constraintTop_toTopOf="parent" />
참고
https://developer.android.com/training/constraint-layout?hl=ko#kts
ConstraintLayout으로 반응형 UI 빌드 | Android 개발자 | Android Developers
컬렉션을 사용해 정리하기 내 환경설정을 기준으로 콘텐츠를 저장하고 분류하세요. ConstraintLayout으로 반응형 UI 빌드 Android Jetpack의 구성요소 ConstraintLayout을 사용하면 플랫 뷰 계층 구조(중첩
developer.android.com
https://kadosholy.tistory.com/131
[안드로이드] ConstraintLayout 제약유형별 속성 및 사용방법
안드로이드 - ConstraintLayout 제약유형별 속성 및 사용방법 목차 ConstraintLayout 이란? ConstraintLayout 제약 유형 ConstraintLayout 제약 유형별 속성과 사용방법 Relative positioning과 관련된 속성 (상대적 위치지
kadosholy.tistory.com
'Android > Study' 카테고리의 다른 글
| [Android] 안드로이드 프로젝트 구성 파일 정리 (0) | 2023.09.23 |
|---|---|
| [Android] 안드로이드 앱 개발의 특징 (0) | 2023.09.19 |
| [Android] View, ViewGroup, XML Layout 이란? (0) | 2023.09.10 |
| [Android] Glide 간단 정리 (0) | 2023.07.28 |
| [Android] MVI 패턴이란? (0) | 2023.05.04 |